Table of Contents
The Table of Contents menu can be used to be quickly taken to each section or subsection.
Follow the steps below to set up your TOC menu.
1. Go to Edition Tools
2. Click the Table of Contents tab
3. Select the Template and Edition you'd like to add the TOC
4. Choose a TOC type
- None - TOC will be disabled
- Sections - Use this if you want to direct your customers to different pages in the catalog. Each section created can be assigned with one go to page
- Go to Page - Use this if you want to direct your customer to one specific page in the catalog
Copying Table of Contents
You can copy the table of contents from one edition to another so you do not have to redo it from scratch. Choose the template and edition you need to copy from.
Then select the template and edition you'd like the TOC to be copied to. Click Copy and you are set. Remember to Save before you exit.
Open Upon Loading
Check this box if you would like the Expandable TOC to open as the catalog loads.
You can choose to not load the TOC on mobile devices. To do so, put a check mark on the "But not for mobile" box. This option will only show once you have selected "Open Upon Loading" box.
Manually add or delete sections in the Table of Contents
You can manually add and delete section in the TOC. Follow the steps below in order to add the TOC Index Section:
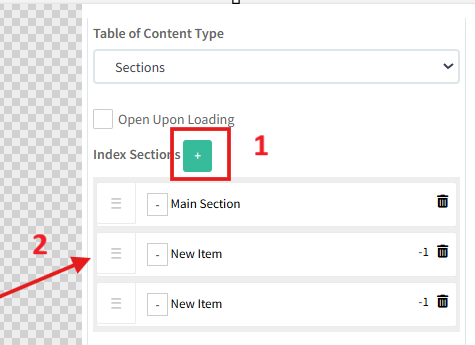
1. Under Table of Content Type drop down menu, choose Sections
2. Click the green plus sign to add your sections
The wording will say "New Item", you can click on this to label the section as you want it to be
Once you have clicked the section title, you can do the following:
- Change the title
- Select the page the section will go to
- Choose to upload an image or add an icon
- Select a title text color
- Select a color for the section
You can also delete a section by clicking the trashcan icon
Adding or Viewing Subsections
To add a subsection
1. Click the green + sign button
To add a subsection
1. Click the green + sign button
2. Once a New Item has been created, indent it by dragging it to the right
Once indented it should look like this:
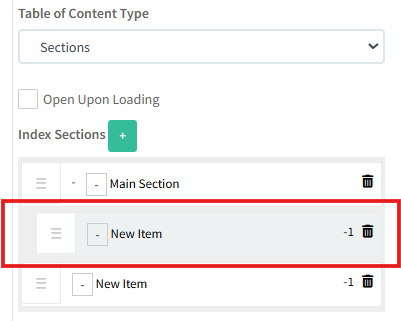
Once indented it should look like this:
Once you have created the subsection, you can view that by clicking the + plus sign button on each section
You can also customize each subsection. You will have the same options:
- Change the title
- Select the page the section will go to
- Choose to upload an image or add an icon
- Select a title text color
- Select a color for the section
Related Articles
Table of Contents
Edition Tools: Table of Contents Table of Contents allows you to create a table of contents button so your readers can press on this and be quickly taken to the table of contents page so they can easily reference pages and information in your ...Open Table of Contents Upon Loading
The default for the expandable TOC is that it is a tab on the side of the viewer. With this feature, you can check a box to have the expandable TOC load immediately upon opening the digital flipbook. Start at the main dashboard: Go to Edition Tools: ...Expandable Table of Contents Tab (Sections)
Expandable Table of Contents Tab (Sections) In addition to the TOC icon, you can add a tab on the side of the viewer that users can pull out and navigate through the headings. In order to add the TOC Index Section, first choose Sections from the drop ...Can I copy Table of Contents from an earlier edition to a later edition?
Yes! In the future, after you've created your edition, you may find you need to update it. In the case of needing to replace the whole file, you can copy the table of contents, so you do not have to redo it from scratch. To do this, you access it ...Will my Table of Contents automatically update after Adding/Deleting Pages?
Please note, if you utilize the Add/Delete Page feature: - You may have to manually edit your Table of Contents. This is to ensure that your pages correspond with the correct sections, as Adding/Deleting pages may shift the page numbering within ...